Installing OpenCV for Java
Introduction to OpenCV for Java.
As of OpenCV 2.4.4, OpenCV supports desktop Java development. This tutorial will help you install OpenCV on your desktop SO.
Install the latest Java version.
Download the latest Java JDK at the Oracle link. Now you should be able to install the last Java JDK by open the file just downloaded.
Install the latest Eclispe version.
Download the latest Eclipse version at the Eclipse Download page choosing the Eclipse IDE for Java Developers version (suggested).
Put the downloaded folder wherever you want to. You don’t need to install anything.
Install Open CV 2.4.6 under Windows.
First of all you should download the OpenCV library (version 2.4.6) from here.
Once you get the folder opencv put in wherever you prefer.
Now the only two things you will need are: the opencv-246.jar file located at \opencv\build\java and the dll library located at \opencv\build\java\x64 (for 64-bit systems) or \opencv\build\java\x86 (for 32-bit systems).
If not present create a data folder under \opencv.
Install Open CV 2.4.6 under Linux or Mac.
The following instructions are useful if you wan to compile OpenCV under Windows.
As first step, if you don’t have these already, download and install CMake and Apache Ant.
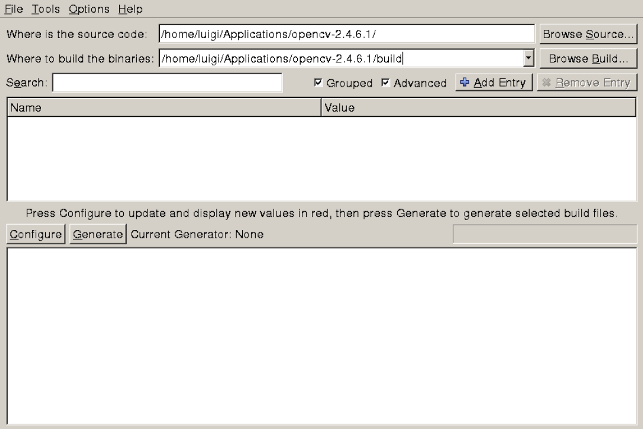
Extract the downloaded OpenCV file in a location of your choice and open CMake ( cmake-gui ).
Put the location of the extracted OpenCV library in the Where is the source code field (e.g., /opencv2.4.6.1/) and put the destination directory of your build in the Where to build the binaries field (e.g., /opencv2.4.6.1/build), at last, check the Grouped and Advanced checkboxes.
Now press Configure and use the default compilers for Unix Makefiles.
In the Ungrouped Entries group, insert the path to the Apache Ant executable (e.g., /apacheant1.9.2/bin/ant).
In the BUILD group, unselect:
* BUILD_PERF_TESTS.
* BUILD_SHARED_LIBRARY to make the Java bindings dynamic library all-sufficient.
* BUILD_TESTS.
* BUILD_opencv_python.
In the CMAKE group, set to Debug (or Release) the CMAKE_BUILD_TYPE
In the JAVA group:
insert the Java AWT include path (e.g., /usr/lib/jvm/java7oracle/include/)
insert the Java include path (e.g., /usr/lib/jvm/java7oracle/include/)
insert the alternative Java include path (e.g., /usr/lib/jvm/java7oracle/include/linux)
Once we have pressed Generate twice the CMake window should appear with a white background. Now close CMake.
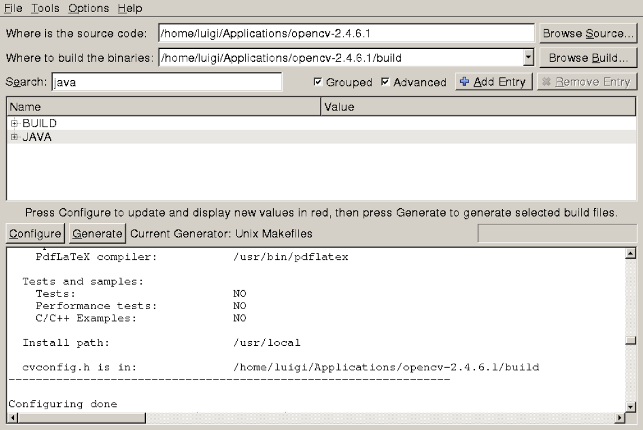
Now open the terminal , go to the build folder of OpenCV and build everything with the command: make -j8 (wait for the process to be completed...).
If everything went well you should have opencv-246.jar and libopencv_java246.so files in the /opencv-2.4.6.1/build/bin directory and the data folder in the /opencv-2.4.6.1/ directory.
Set up OpenCV for Java in Eclipse
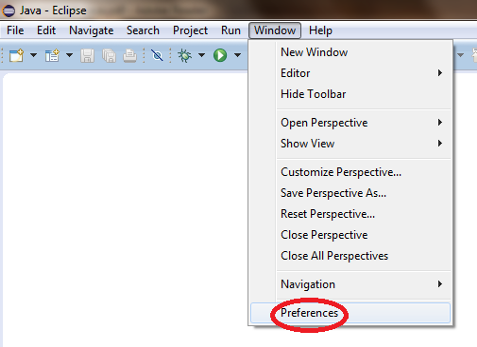
Open Eclipse and select a workspace of your choice. Create a User Library, ready to be used on all the next projects: go to Window > Preferences....
From the menu navigate under Java > Build Path > User Libraries and choose New....
Enter a name for the library (e.g., opencv246) and select the newly created user library.
Choose Add External JARs..., browse to select opencv246.jar.
After adding the jar, extend it and select Native library location and press Edit....
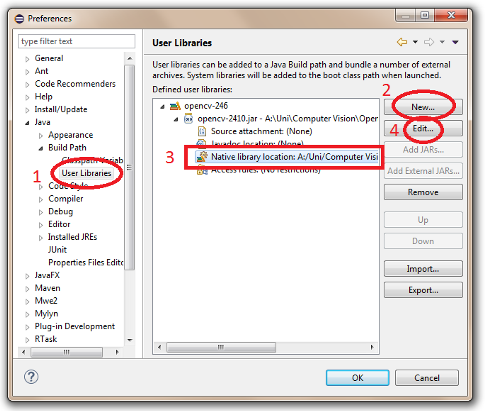
Select External Folder... and browse to select the folder containing the OpenCV libraries (e.g., C:\opencv\build\java\x64 under Windows).